How To Setup Wifi Mesh
A reliable home network is no longer just about getting a signal in the same room as the router. Modern homes often have laptops, phones, smart TVs, games consoles, security cameras, voice assistants and other connected devices competing for bandwidth. That makes WiFi coverage a practical household issue, not just a technical detail.
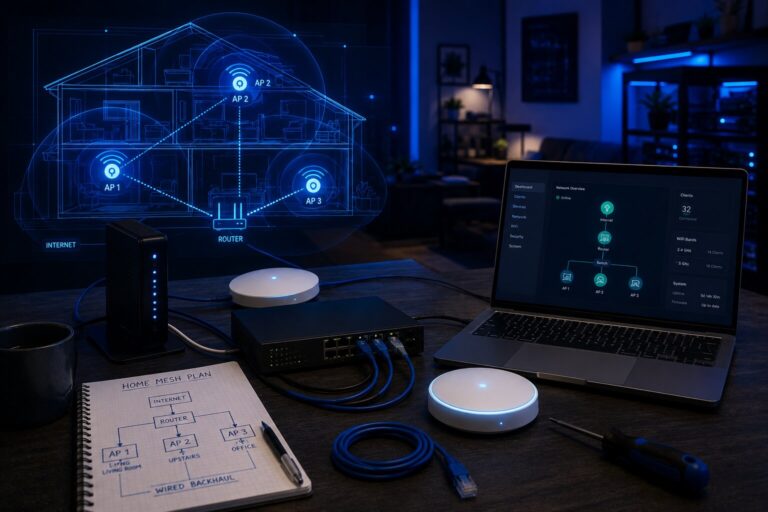
A wireless mesh system is designed to solve this by using two or more mesh nodes to spread WiFi more evenly around the home. Rather than depending on one router to reach every room, a mesh network creates a broader, coordinated wireless system. Ofcom notes that mesh systems can improve WiFi signal strength and coverage by using boxes placed around the home, although larger properties may need more units.
What A Wifi Mesh System Actually Does
A traditional router broadcasts WiFi from one location. That can work well in a small flat or open-plan space, but signal quality drops when it has to pass through walls, floors, metal structures, large appliances or long distances.
A mesh system uses a main node connected to your broadband router, plus one or more satellite nodes around the property. These nodes communicate with each other and help devices connect to the strongest available signal.
That is different from simply adding an old-fashioned extender. A basic extender often creates a separate network name and may reduce performance. A mesh system is designed to feel like one joined-up network, with devices moving between nodes more smoothly.
This distinction matters when comparing wireless mesh systems and powerline adapters, because both can improve home connectivity, but they solve the problem in different ways.
Before You Buy: Check What Problem You Are Solving
Before setting up WiFi mesh, identify the problem. A mesh system is usually useful when:
- some rooms have weak or unreliable WiFi
- video calls drop in certain parts of the house
- smart TVs buffer despite a fast broadband package
- smart-home devices disconnect
- upstairs or garden-room coverage is poor
- one router cannot handle the layout of the home
However, mesh does not magically make slow broadband faster. If your internet connection from the provider is poor, mesh can improve distribution inside the home, but it cannot create extra external bandwidth.
This is why anyone asking whether they need to improve home WiFi should first separate broadband speed from in-home signal coverage.
Choosing The Right Mesh System
Most homes should look for a mesh system that supports at least WiFi 6. WiFi 6E and WiFi 7 systems add access to newer wireless capabilities, with WiFi 6E extending WiFi 6 into the 6 GHz band and WiFi 7 bringing further performance, capacity and reliability improvements.
That said, the newest system is not always the best value. A household with standard broadband, a few streaming devices and general browsing needs may be perfectly well served by a good WiFi 6 mesh kit. A larger home with gigabit broadband, many devices or heavy gaming and streaming demands may benefit from tri-band, WiFi 6E or WiFi 7 hardware.
When comparing systems, look at:
- number of nodes included
- coverage claims
- WiFi standard
- whether there is a dedicated wireless backhaul
- number of Ethernet ports
- app quality
- parental controls
- security update support
- compatibility with your broadband router
For a broader buying decision, a separate comparison of key wireless mesh systems can help narrow the options.
How Many Mesh Nodes Do You Need?
A small flat may only need one strong router, not a mesh system at all. A typical two or three-bedroom house often works well with two mesh nodes. Larger homes, thick walls, extensions, loft conversions or garden offices may need three or more.
The most common mistake is buying too many nodes and placing them too close together. Mesh nodes need to be close enough to communicate strongly with each other, but far enough apart to extend useful coverage.
A good rule is to place the first satellite node halfway between the main router and the weak-signal area. If the node itself is placed in a dead zone, it has little signal to repeat. It should sit where the signal is still decent, then push coverage further out.
Step 1: Prepare Your Existing Router
Most mesh systems begin with a main mesh unit connected to your existing broadband router by Ethernet cable.
Before installation:
- restart your broadband router
- check that your internet connection is working
- download the mesh system’s setup app
- create or sign into the manufacturer account if required
- decide whether to use router mode or bridge/access point mode
Router mode lets the mesh system handle routing, device management and WiFi. Bridge mode leaves the original router in charge and uses the mesh kit mainly for wireless coverage.
For many users, router mode is simpler if the broadband router’s WiFi can be turned off. But if your ISP router handles important services, phone features or TV functions, bridge mode may be safer.
Step 2: Connect The Main Mesh Node
Plug the main mesh node into power and connect it to your broadband router using an Ethernet cable. Most systems have a clearly marked WAN or internet port.
The app will usually detect the node, test the internet connection and ask you to create a WiFi network name and password.
At this stage, it is worth deciding whether to reuse your old WiFi name and password. Reusing them can allow existing devices to reconnect automatically. Creating a new name gives you a cleaner setup and helps avoid confusion if the old router WiFi is still active.
For a clean setup, turn off WiFi on the old router if the mesh system is taking over wireless duties. Running two competing WiFi networks from the same place can create interference and confusion.
Step 3: Place The Satellite Nodes
Once the main node is working, add the satellite nodes one at a time.
Place each satellite:
- in an open position
- away from thick walls
- away from microwaves and large appliances
- off the floor
- not hidden inside a cabinet
- within reasonable range of another mesh node
The app will usually tell you whether placement is good, weak or too far away. Take this seriously. A node in the wrong place may show full bars to nearby devices but still have a weak connection back to the rest of the mesh.
This is one of the most important parts of connecting a wireless mesh extender properly, because placement often matters more than the hardware specification.
Step 4: Test Coverage Room By Room
After setup, walk around the home and test the connection in the rooms that previously had problems. Use normal real-world tests as well as speed tests.
Check:
- video calls
- streaming apps
- smart TV playback
- gaming latency
- phone browsing
- smart speaker response
- security camera reliability
Speed test results will vary depending on the device, distance, server and time of day. They are useful, but they are not the only measure. Stability, low latency and fewer dropouts often matter more than peak speed.
For gaming, a wired connection is still preferable where possible. A mesh system with Ethernet ports on the satellite nodes can be useful, but competitive players may also want to compare gaming networking solutions using powerline adapters.
Step 5: Update Firmware And Security Settings
Once the mesh network is online, check for firmware updates. Router and mesh firmware updates often include security fixes, stability improvements and device compatibility updates.
Use:
- WPA2 or WPA3 security where available
- a strong WiFi password
- automatic updates if the system supports them
- guest networks for visitors
- separate access for smart-home devices if useful
This is increasingly important as more connected devices enter the home. If you are building a connected household, it is worth reading more about what defines a smart home device in 2026, because smart lighting, cameras, speakers, appliances and sensors all depend on the quality and security of the network beneath them.
Step 6: Connect Smart-Home Devices Carefully
Smart-home devices can be awkward on mesh networks because many still rely on 2.4 GHz WiFi. Some mesh systems combine 2.4 GHz and 5 GHz under one network name, which is convenient but can occasionally confuse older devices during setup.
If a device will not connect:
- move your phone close to the device during setup
- temporarily disable 5 GHz if the app allows it
- use the IoT or smart-home network feature if available
- check whether the device only supports 2.4 GHz
- update the device app before pairing
This becomes more relevant as homes become more automated. A mesh network can be part of a wider total home automation setup, especially where smart cameras, heating controls, lighting systems and voice assistants need stable coverage throughout the property.
Common Setup Mistakes
The most common mesh setup errors are usually avoidable.
One is placing satellite nodes in the rooms with the worst signal. That seems logical, but a mesh node needs a good signal itself. Put it between the router and the problem area instead.
Another is leaving the old router WiFi active with the same or similar network name. That can cause devices to cling to the wrong access point.
A third is expecting wireless mesh to perform like Ethernet. Mesh is convenient, but wired backhaul is better if you can connect nodes using Ethernet cables. Some homes can use existing Ethernet wiring; others may use powerline adapters as an alternative, although performance depends heavily on household electrical wiring.
For troubleshooting, a dedicated guide to common issues with wireless mesh systems can cover dropped connections, poor roaming, slow speeds and device compatibility problems in more detail.
Mesh Versus Building Your Own Network
Most consumer mesh kits are designed for simplicity. The app handles setup, updates, node management and network optimisation.
More technical users may prefer to build their own wireless mesh network at home using compatible routers, access points or open networking tools. That can provide more control, but it also requires more knowledge of channels, backhaul, IP addressing, firmware and security settings.
For most households, a ready-made mesh system is the better choice. For hobbyists or larger properties, a custom approach may be worth exploring.
Where Powerline Adapters Fit In
Powerline adapters send network data through a home’s electrical wiring. One adapter connects to the router, while another plugs in elsewhere in the home and provides Ethernet, WiFi or both. This can be useful where wireless signals struggle to pass through walls or floors.
However, powerline performance can vary. It depends on the quality, age and layout of electrical wiring, as well as interference from appliances. That is why a separate guide to how powerline adapters work is useful before treating them as a guaranteed fix.
For some homes, mesh is better. For others, powerline is better. In many cases, a hybrid setup can work well: mesh for general wireless coverage, Ethernet or powerline for fixed devices such as consoles, desktop PCs or smart TVs.
Is Mesh Worth It?
A mesh system is worth considering if your broadband is good near the router but poor elsewhere in the home. It is especially useful for larger homes, awkward layouts, smart-home setups and households with many connected devices.
It may not be necessary if you live in a small property, already get strong coverage everywhere, or mainly need one wired connection to a single device.
The most important point is to treat mesh as a coverage and reliability tool, not a magic speed upgrade. Installed well, it can make the internet feel much better because devices stay connected more consistently.
As AI-powered hardware and connected devices become more common, home networks will matter even more. A stable mesh setup can provide the foundation for the next generation of smart devices without forcing every device to compete around one overloaded router.
If you have practical experience with home networks, consumer technology or connected devices, Dykes Do Digital also welcomes expert-led contributions through our Write For Us page.